Nitty Gritty Science has a new location...


Thanks for all your support - I hope you will join me at my new website where you will find all the same great science resources you've come to love from Nitty Gritty Science and MORE!!

Using Word Walls in Science

Making Vocab Connections

Word walls used to be a term heard only in elementary schools.  Nowadays it is more common that teachers of all grade levels are finding them effective and worthwhile for their students to develop and reinforce content area vocabulary.


In 2011, The National Research Council (NRC) developed A Framework for K-12 Science Education which identified practices of science and engineering that were essential for all students to learn.  One of the practices involved students obtaining, evaluating and communicating information.  It states:

Any education in science and engineering needs to develop students’ ability to read and produce domain-specific text. As such, every science or engineering lesson is in part a language lesson, particularly reading and producing the genres of texts that are intrinsic to science and engineering. (NRC Framework, 2012, p. 76)

By using a word wall in the science classroom, the teacher increases access to domain-specific text and can refer the students to it often.  Teachers should have students interact with the word wall to help develop concepts and demonstrate content mastery.  This can occur by adding arrows to show sequence, or group words together by categories.  By interacting with the word wall often, students will start making connections between the current science concepts they are learning as well as previously learned science topics. 

Visual Vocabulary

It’s important when making word walls that a picture or illustration is used alongside the vocabulary term to serve as a visual cue.  This is especially important to your English language learners who have been shown to benefit from increased exposure to print and language.

Limited Space?  Get Creative!

Sometimes wall space is limited in the classroom, forcing teachers to get creative.  One of the most unused real estate in the classroom is the ceiling – start building your students vocabulary above their heads.  At least when all faces are turned toward the sky, you’ll have immediate feedback that the word “ceiling” is in use. 


Using the back of the classroom door or fronts of cabinets will still allow students to see and interact with the scientific terminology.  However, words will need to be changed between each chapter or unit, so make it easy on yourself and place Velcro strips on surface and backs of cards for clean and easy exchange.

Download my FREE Nature of Science Word Wall to help you get started increasing your students' use of science vocabulary.  
Click to download

Looking for more?  Check out my Physical Science Word Wall Bundle with over 240 words to use throughout the school year.

Enjoy!

Taking Nitty Gritty Science to Nashville!

When you think of Nashville, you probably picture country music, honky tonks and...science teachers! Wait, what??  Well that's exactly what you found this past weekend during the 2016 NSTA National Conference in Nashville, TN.

I set out with the crazy idea of doing an exhibition booth for the first time, and you know what they say, "crazy loves company" (okay, no one says that) so, I invited my good friends Amy Brown (Amy Brown Science) and Tracey Graham (Smart Chick) to head to Nashville so we could share our curriculum and resources we design and create for our stores on Teachers Pay Teachers (www.teacherspayteachers.com).

After months of preparation on our displays and products and getting our teams together, the day finally came and we weren't sure what to expect.  However, after the first hour of our booth being open, I think I can speak for all of us when I say the results were beyond our expectations.  We met so many teachers from across the fifty states and even across the globe!  Some would seek us out just to share that they used our products already, and it was humbling to hear how our products made their job so much easier in the classroom and how much the students were engaged using our science lessons.

I'm excited to say it was such a success that we'll be heading to Los Angeles for next years NSTA National Conference and will be making some state and regional appearances along the way.  I'll keep you posted of our future travels in case we swing by a conference near you!

I also want to congratulate the three winners Johnny M., Jill C. and Teresa G. for winning the Science Interactive Classroom Starter Pack (valued at $100)  through my giveaway hosted at my booth!  Did you miss the conference?  No worries, you can pick up my two FREE handouts here for a limited time - click on image below to download.

All rights reserved by author: Nitty Gritty Science, LLC

A personal thank you goes out to my my mom, Linda, who embroidered my NGS logo on our shirts/cardigans (which were a big hit by the way) and to my friend Carla Brooks, also a seller on TpT (check out her store Science Island) who stood with me for 21 hours this past weekend to help share Nitty Gritty Science interactive notebooks and resources!

Want more freebies and updates?  Make sure to sign up for my newsletter above!

Take care,

Making Editable Notes Work for You and Your Students

Taking notes in science class is essential for students to get the needed information of the topic being studied.  However, how students take their notes is key in how they retain and recall the information when they need it.

Many teachers are using Science Interactive Notebooks which feature notes, or Teacher Input on the right hand side and an interactive activity, or Student Output on the left hand side.  The Teacher Input side is where students are to put all the information you want them to understand.  So, the question now is - how is that information delivered?
bacteria virus protists
Life Science Interactive Notebook: The Microbial World
I've created an editable resource bundle for every chapter of my Science Interactive Notebook series (Life, Earth and Physical Science). Each bundle includes notes, PowerPoints and chapter tests which are all editable so you can make sure they meet the needs of your students.

The following are two variations on the guided note-taking method - Variation A is a guided outline and Variation B features a sentence completion strategy.  Choose one version that works for you, or use both if you feel some students need differentiation.  Guided notes provide a framework of the content but leave out key vocab or main ideas that students are responsible for.  They can either find the missing information through research, or by listening to the teacher as a lecture progresses.

VARIATION A: GUIDED OUTLINE

This method allows you to take the editable notes and erase much of the main content, leaving students to find definitions, contrasting information and main details of the topic.  By giving them a guided outline, you have given clear structure of what information you want them to find, but at the same time have made them self-directed in their learning.  This method requires students to research the necessary topics to fill in the missing information.

science interactive notebook
VARIATION B: SENTENCE COMPLETION

Sentence completion, or fill-in-the-blank is another  note-taking format you can create from my editable notes that provide students with a more complete framework, yet still requires active listening skills during a PowerPoint lecture (as opposed to providing full copies of notes in their entirety that students just copy).  If this variation of notes is given before the lecture, it will require students to read through their textbooks or research online to find the important words/phrases that complete each sentence.  This is a perfect variation if you have ESLL students who are struggling with science vocabulary or if a student's IEP require that they have modifications for note-taking.

editable notes; editable resources; nitty gritty science


I get many questions like this one below:
"I've purchased your Earth and Space science interactive notebook and editable notes and PPT. I was just wondering how this looked in your classroom.  Do you typically go through the notes, then do the student output side second?... I just want to make sure I am using this resource to its full ability! Thank you!"

My answer:
Our school schedule was on block scheduling so this is based on a 75 minute period.  On test day, as soon as students finished a test, they would turn it in and pick up the next set of notes on my desk (Variation A) and return to their desk to use their textbook to look up the information.  I would set up this routine, so students understood that what they didn't finish in class was for homework that evening.  Once they returned to class, I could have a more engaging PowerPoint lecture since I would be able to teach information instead of just standing there waiting for students to copy.  This would allow lecture to be shorter, leaving time for them to work on the output activity which I would only give them an alloted 20-25 minutes.  Again, whatever was not completed was expected to be finished as homework.  Then I would move onto either pre-lab or another activity.  Using this method, students learned to use their time very wisely and very rarely did they have homework.

If you're strapped for time or have shorter periods, then just use Variation B of the notes and have students fill in as you go through the PowerPoint.

I hope this gives you a better understanding on what a powerful resource these editable notes can be and to let you know I'm willing to answer any questions or give clarification if needed.  This method can be done with any note set, but to help save you time, I've completed them for you.  You can check them out here:


Science Sub Plans

Like most teachers, you will find that a substitute teacher is needed every now and then. Sometimes the absence is planned and sometimes it is not. Substitute teachers have a very difficult job. Not only are they expected to cover a classroom full of often unknown students, but they also usually receive very short notice on the days they are to work.

substitute plans science teacherMore often than not substitute teachers find they are left with very little information and direction provided to them. Don’t be that teacher – set your substitute up for a successful day by utilizing my Secondary Science Sub Plans.  

This download includes two components: 1. An editable substitute handbook in which you can fill in information such as classroom policies, emergency procedures and contacts and even helpful students; and 2. Secondary science lessons that will engage students and allows them to be self-directed learners.

This resource will give a substitute teacher the tools he or she needs to make sure that both they and the students have a productive day.  I can promise you by showing the substitute teacher that you’re taking the time to help them, they will always be on call to help you.

substitute plans science teachereScience Lessons Included:

Communicating with Graphs - students are asked to either use different graphs to answer the questions, or use the data to complete the graphs (line, bar and age structure).

Arachnid Id - Students are given informational cards on 12 different spiders and are asked to read them in order to solve a puzzle that uses descriptions from the cards.

Periodic Table Word Search - Students are given element symbols and will need to use the Periodic Table to discover the name of the element  in order to search for it in the word search.

Wait...do you have the science lesson, but just need the editable substitute teacher handbook?  Click on the picture to check out this invaluable resource.
substitute teacher

Thank you for joining our featured event "Need Sub Plans?  We've Got You Covered" which is part of the monthly Secondary Smorgasbord Blog Hop hosted by Darlene Anne Curran (The ELA Buffet) and Pamela Kranz (Desktop Learning Adventure).
Please check out the TWO LINK UPS available for this month's event below:


TpT Sellers are GIVING BACK

2015 brought a lot of changes for my family and one of them was moving back to the northern East coast, which also meant moving back to cold and snow...brrrrrr.   I could not imagine heading outdoors this time of year without my scarf, mittens, hats and a warm coat, but unfortunately, I know many do because they are without them.  

My daughter came home this month and told me about a program her preschool class is organizing which collects winter clothing for other preschool kids who are in need.  When she started collecting her own mittens exclaiming, "I need to take these to my school for the mitten tree!" I let her know I had a better idea where we could help out AND she could keep her own mittens.

This season my family will be giving back to our local Head Start program through the Giving Tree program at my daughter's school.  So, on December 13, 2015, I will donate 100% OF MY SALES from my Nitty Gritty Science Store to help the children and families worry less about staying warm and worry more about finding the best place for snowball fights and sledding!


This holiday season if you have some items on your wish list, know that by purchasing them on December 13, 2015 you will not only be getting a fantastic lesson plan, but you will also be helping children in a most fantastic and warming way!  

Please make sure to check out other seller's stores as many will also be donating a percentage of their sales that day!  Look for this logo on store pages to see who's participating or check out the Link-up below.


Sellers: Please use this dropbox link to download logo to use on December 13, 2015.


5 Days of Holiday CHEER!

I got a sneek peek, and guess what?  You're on the NICE LIST...well, of course you are, you're a Science teacher!  Well, then you deserve something extra special, like the 5 Days of Holiday Cheer coming to your inbox December 7 - 11!  

Wait, you haven't signed up to receive the Nitty Gritty Science Newsletter?  There's still tons of time! Once signed up, you will not only receive some AMAZING deals and resources during this 5 Days of Cheer, but you can expect exclusives, freebies and science resources all year long!  

Since your here, let me give you an early gift... enter below for a chance to win a $25 Gift Certificate to use in my Nitty Gritty Science store too.  This is going to be fun - let the holiday season begin!!


a Rafflecopter giveaway

Keys to a Successful Science Interactive Notebook

Science Interactive Notebooks are the cornerstone of my science curriculum and continue to be because of these Keys to a Successful Science Interactive Notebook that I keep in mind when designing new material for you.

1. Introduce topics by asking a guiding question.

A guiding question is essential in helping students focus on the topic of study and frame their new knowledge in a way that helps them solve a problem.  I include my guiding questions on the top margin of each Teacher Output page (notes) as shown below.


2. Deliver information using a "chunking" strategy.

Chunking refers to an approach that breaks up long strings of information into units or "chunks" that are more manageable by reducing the cognitive load as the learner processes information making it easier to commit to memory.

3. Encourage students to use color to highlight key vocab and text.

Allowing students to use color when completing their notes stimulates the creative side of their brain and helps them visually separate and recall the information they are writing.

4. Apply new information immediately.

What makes an interactive notebook "interactive" is the teaching strategy of giving students an activity for them to complete in their notebooks that will actually make them USE and APPLY the information you just gave them immediately.

5. Use a variety of interactive activities in order to reach all the different learning styles.

One reason I see interactive notebooks fail is because students lose interest in them when they are given the same foldable or same flip book for every new topic introduced.  I go to great lengths in making sure that my science interactive notebooks will offer original activities for students of all learning styles throughout the year.

6. Use quick assessments to check for understanding.

I have found that having students complete a mini-quiz the following day after notes helps refresh their memory and gives the teachers an opportunity to check for understanding.

7. Set aside some class time for students to work on interactive notebook activity.

Science interactive notebooks are the foundation for teaching new material, so it's important when assigning an activity to set aside at least 15-20 minutes of class time for students to work so that the assignment is understood, students have access to materials needed to complete activity, and opportunity for questions/clarification are given.

8. Have students share notebooks with peers and parents.

My biggest fans of my Science Interactive Notebooks are parents.  They are absolutely thrilled to see the creativity of their students work and students are proud to share them.  I think it's important that parents see them at least once a quarter.  Here's a Parent Letter you can use to explain what it is and allow them a place to leave comments for their child's work.


If you're new to Science Interactive Notebooks, make sure to download my Intro to Science Interactive Notebooks for FREE or feel free to ask questions in the comment section below.

If you're looking for more Science Interactive Notebooks, check out my Triple Play Bundle that features my Earth & Space, Life and Physical Science Interactive Notebooks:


Plate Tectonics and Sea Floor Spreading for Science Interactive Notebooks

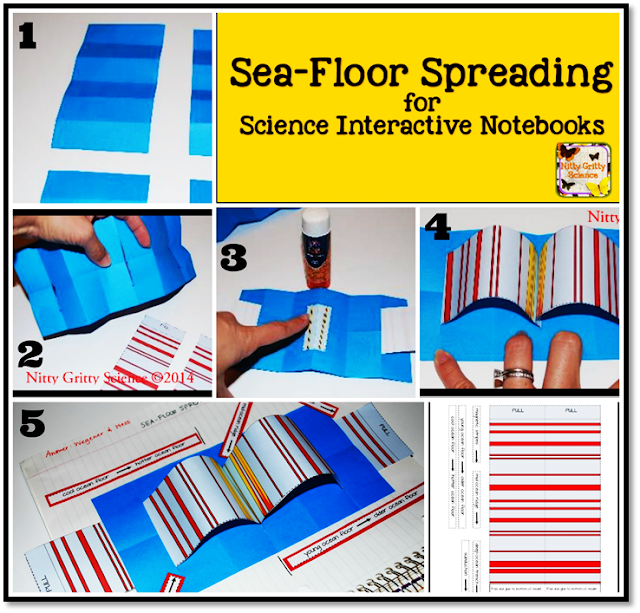
Teaching the concept of sea-floor spreading can be easily modeled using my simple, yet powerful interactive resource for science interactive notebooks.
Earth Science Interactive Notebooks - sea floor spreading
Click image to view product

Using the given template
Plate tectonics earth science sea-floor spreading
click image to view product
and a sheet of colored paper, students will be able to manipulate a model that will allow them to visualize, label, and describe the evidence of Hess's theory of sea-floor spreading which include evidence from molten material, magnetic stripes and drilling samples.  This activity can be found in my Earth Science Interactive Notebook: Plate Tectonic chapter which also features INB activities for:


Plate tectonics sea-floor spreading


All of my science interactive notebook chapters come with the TEACHER INPUT NOTES (as seen above in first picture), detailed instructions for STUDENT OUTPUT ACTIVITIES, MINI-QUIZZES for each concept of the chapter and ANSWER KEYS!

Have fun and enjoy watching your students get excited about their Science Interactive Notebooks!

Celebrating EARTH SCIENCE WEEK

It's EARTH SCIENCE WEEK!  Doesn't that make you just want to sing!?!?
This year the American Geosciences Institute will be organizing Earth Science Week which runs October 11-17 and celebrating the theme "Visualizing Earth Systems".

Everyone can participate in Earth Science Week and most of the work has been done for you.  You can find a list of engaging and educational classroom activities that are based on the Next Generation Science Standards and are marked with the appropriate grade level here.

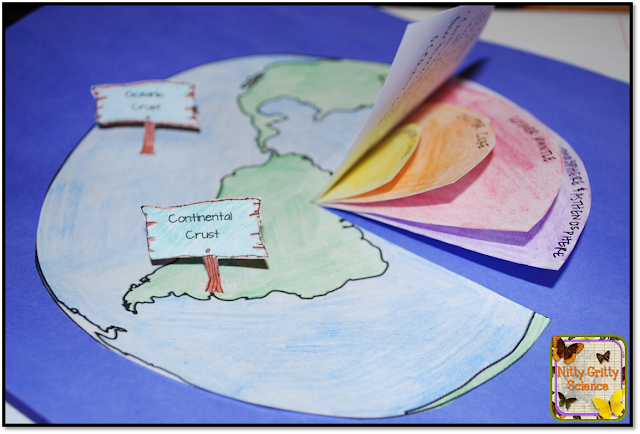
Each day this week I'll be celebrating Earth Week by sharing freebies, special promotions and products with you.  Make sure to follow me on Facebook (www.facebook.com/NittyGrittyScience) to be notified!  My first gift to you, offered for a limited time, will be instructions and printables for making this Earth's Interior interactive activity that is featured in my Earth Science Interactive Notebook: Plate Tectonics.
Interactive Science Notebook
Click picture to download FREEBIE


Did you miss Earth Science Week this year?  Don't worry, the American Geosciences Intstitute love Earth Science so much, that they even made it possible for you to extend the celebration from one week to the whole school year!  Check out this amazing 2015-2016 Activity Calendar which provides, "information about "Visulalizing Earth Systems" activities, career opportunities, happenings, important dates in history, even participation tips, and links to resources on the Web".
If you've organized a special event, celebrate your students' work at school and throughout your community.  I would love it if you wanted to share here with other educators  - please send your photos to nittygrittyscience@gmail.com or share in the comments below on your celebrating!

Interactive 3D Topographic Map YOU CAN BUILD!

science interactive notebooks topography map
Are you ready to have your students FLIP OUT over topographic maps??  Well, with the help of the researchers at UC Davis and interactive 3D projection technology (and a little sand) you CAN BUILD THIS and blow your students minds!


ucdavis.edu
Using this setup of a Microsoft Kinect, digital projector, and a sandbox, you can now make an interactive topographic map that will show contour lines and elevation in real time and respond to you and your students' actions.

The sandbox in it's natural state gets transformed when the Kinect and the digital projector are turned on and display the graphics from above.

countour lines
ucdavis.edu
contour lines lesson plans
ucdavis.edu
Don't have time to build one yourself or feeling overwhelmed with the technical portion?  Take advantage of those awesome brains coming into your classroom every day! This is a perfect STEM project to get your science students excited about technology and engineering, just like these students from Ithaca's High School FIRST Robotics Team 639. The students built the following Augmented Reality (AR) sandbox in 2013 and have since donated it to a children's museum.
contour lines
ucdavis.edu

ucdavis.edu
Ready to get started?  Go ahead and download these instructions for construction and software setup.  Think your students need some more background on topographic maps and contour lines?  Then check out this chapter from my Earth Science Interactive Notebook series: Mapping Earth's Surface

Want to see more?  Here's a video (ucdavis.edu) showing a virtual dam failure and levee break - simply amazing!!

C'mon, tell me this wouldn't get your students excited about Earth Science.  Have fun with this one!!

Make sure to sign up for my newsletter to get more engaging science lessons and resources that will enhance your curriculum and engage your students throughout the school year.


Related Posts Plugin for WordPress, Blogger...